October 2, 2026
How to Reduce Video File Size on iPhone

Your iPhone fills up at the worst possible time. A quick clip of a kid's game, a concert encore, or a work demo suddenly becomes a storage problem, and the warning pops up before the camera can even finish saving. The fix isn't just “compress later.” The win comes from stopping oversized files at the source, then shrinking the clips that are already sitting in Photos.
Table of Contents
- Why Your iPhone Videos Take Up So Much Space
- Adjusting Camera Settings to Prevent Oversized Files
- Compressing Existing Videos Using Built-in Apple Tools
- Shrinking Videos with Third-Party Apps and LuminaClean
- Automating Compression with iOS Shortcuts
- Balancing Video Quality and Storage Space
Why Your iPhone Videos Take Up So Much Space
The biggest storage trap is simple, high-quality recording. Apple recommends lowering capture resolution below 1080p HD, turning off HDR Video, and using High Efficiency so the camera records in HEVC instead of a larger compatibility format, because those choices reduce file size before a video ever lands in the library Apple Support. If the phone stays set to 4K, HDR, or Most Compatible, each minute of video carries far more data.
Capture quality beats storage every time
On a phone shooting 4K HDR, a long vacation vlog can eat through storage at a pace that surprises people who only use the camera casually. Apple's general guidance backs the same idea, the settings you choose at capture time matter more than cleanup later Apple Support. A phone configured for maximum quality is doing exactly what it was told to do, but the result is that space disappears quickly, especially when video is recorded often.
Practical rule: If the clip is meant for quick sharing, not archival editing, it probably doesn't need the heaviest capture settings.
The codec also matters. Apple says HEVC, also known as H.265, offers better compression than JPEG and H.264 and uses less storage while preserving the same visual quality Apple Support. That is why the format menu inside Camera is one of the first places to check on any iPhone that keeps running out of space.
Why the default feels invisible until it hurts
Many users never notice the setting until storage is already tight. The phone can shoot beautifully in high-quality modes, but those same modes are exactly what make a long birthday video or a string of travel clips consume gigabytes in a hurry.
Preventing oversized files at the source saves more space than compressing them afterward, especially for people who record every day. Reduce the size of new recordings first, then trim and export the older ones that already exist. For a broader storage cleanup, the same mindset applies to photos and videos together, as explained in this guide to iPhone storage full and how to free space.
Adjusting Camera Settings to Prevent Oversized Files
A short family clip can consume far more space than expected when the iPhone records at its highest quality. The most effective fix happens before recording. Open Settings, choose Camera, and review the recording, format, resolution, frame-rate, and HDR options before shooting the next video. Apple recommends lower capture resolution, High Efficiency, and disabling HDR Video when storage matters Apple Support.
Set the format before choosing resolution
Choose High Efficiency first. It records video in HEVC, also called H.265, which uses less storage than a larger compatibility format while maintaining comparable visual quality Apple Support. Most Compatible can make sharing easier with older devices and software, but it produces larger files. Use it when compatibility is the priority, not as the default for everyday recording.
Then choose a resolution that matches the clip's purpose. For most users shooting casual content, 1080p is the smarter default because it cuts storage use by half compared to 4K while remaining sharp on phone screens. Apple also provides lower capture options for people who need to reduce storage use further Apple Support.
Good storage habit: Set the camera for the average clip you shoot, not the occasional special one.
Reserve HDR and high resolution for footage that needs them
HDR Video can preserve more detail in bright and dark areas, but it increases the amount of data recorded. 4K has the same trade-off, particularly at a high frame rate. Use those settings for footage intended for editing, archiving, or display on a larger screen. For routine messages, social posts, and quick family videos, a lower setting keeps files easier to store and share.
Check the setting again after an iOS update or when switching between camera modes. A single change can affect every new recording, so prevention is more efficient than compressing a full library later. For broader on-device cleanup, a privacy-first tool such as LuminaClean can help identify large videos without requiring them to leave the phone.
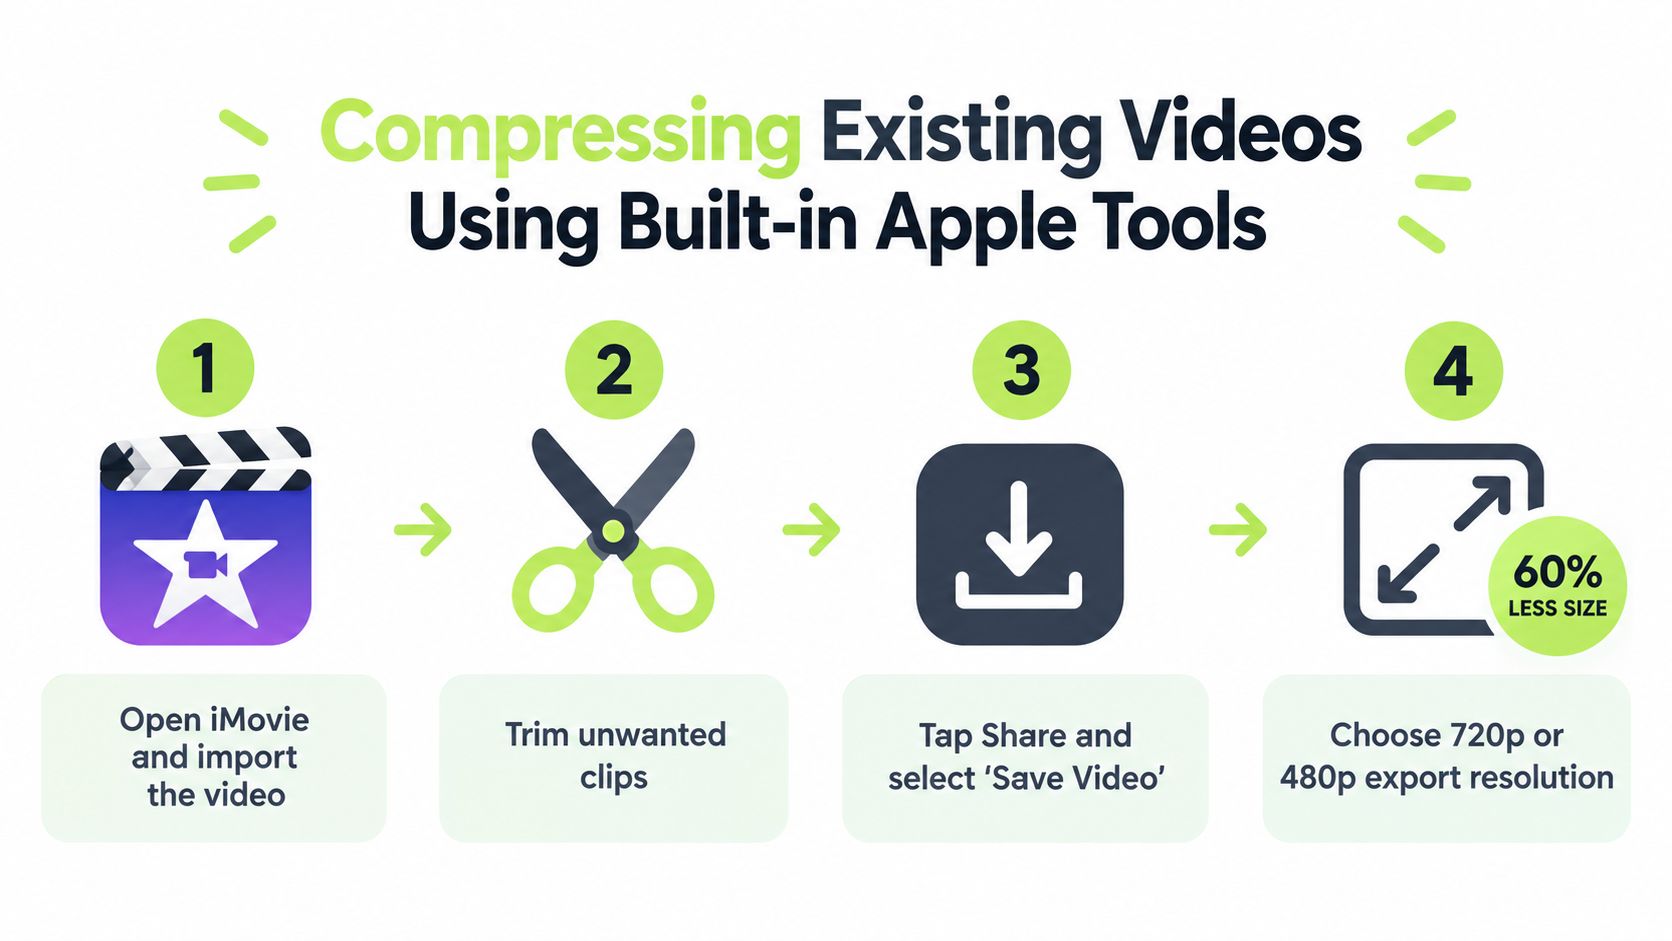
For existing clips, the native workflow is still straightforward: import the video into iMovie, trim unnecessary sections, choose a lower export resolution, and save or share the smaller copy. The how to reduce video file size on iPhone with built-in tools visual covers the same process.
Compressing Existing Videos Using Built-in Apple Tools
Once a video is already in your library, iMovie’s export settings offer the fastest path to a smaller file without third-party software. Import the clip, choose a lower resolution, and save a separate copy so the original remains available. Apple lists 720p, 540p, and 360p as export options for reducing video size in its support guidance.
iMovie is the simple export path
Open iMovie, start a movie project, and select the clip from Photos. Trim unwanted footage before exporting, then use the share menu to choose a resolution. 720p usually suits messaging and casual sharing, while 540p or 360p can make more sense when storage or upload speed matters more than detail. The lower the resolution, the smaller the exported file, but text, faces, and fine background detail will appear softer.
Save the result as a new video rather than replacing the original. This gives you a smaller copy for sharing while preserving the high-quality version for editing or archiving. If the clip contains long pauses or accidental footage, trimming first can reduce its size without changing the quality of the sections you keep.
For MOV files, export bitrate also affects the result. The reduce MOV file size guide recommends setting the bitrate to 8 Mbps for 1080p content, which can roughly halve the file size with limited visible quality loss. Use that target when resolution is acceptable but the export still feels too large.
Photos can do a smaller job, but not the same job
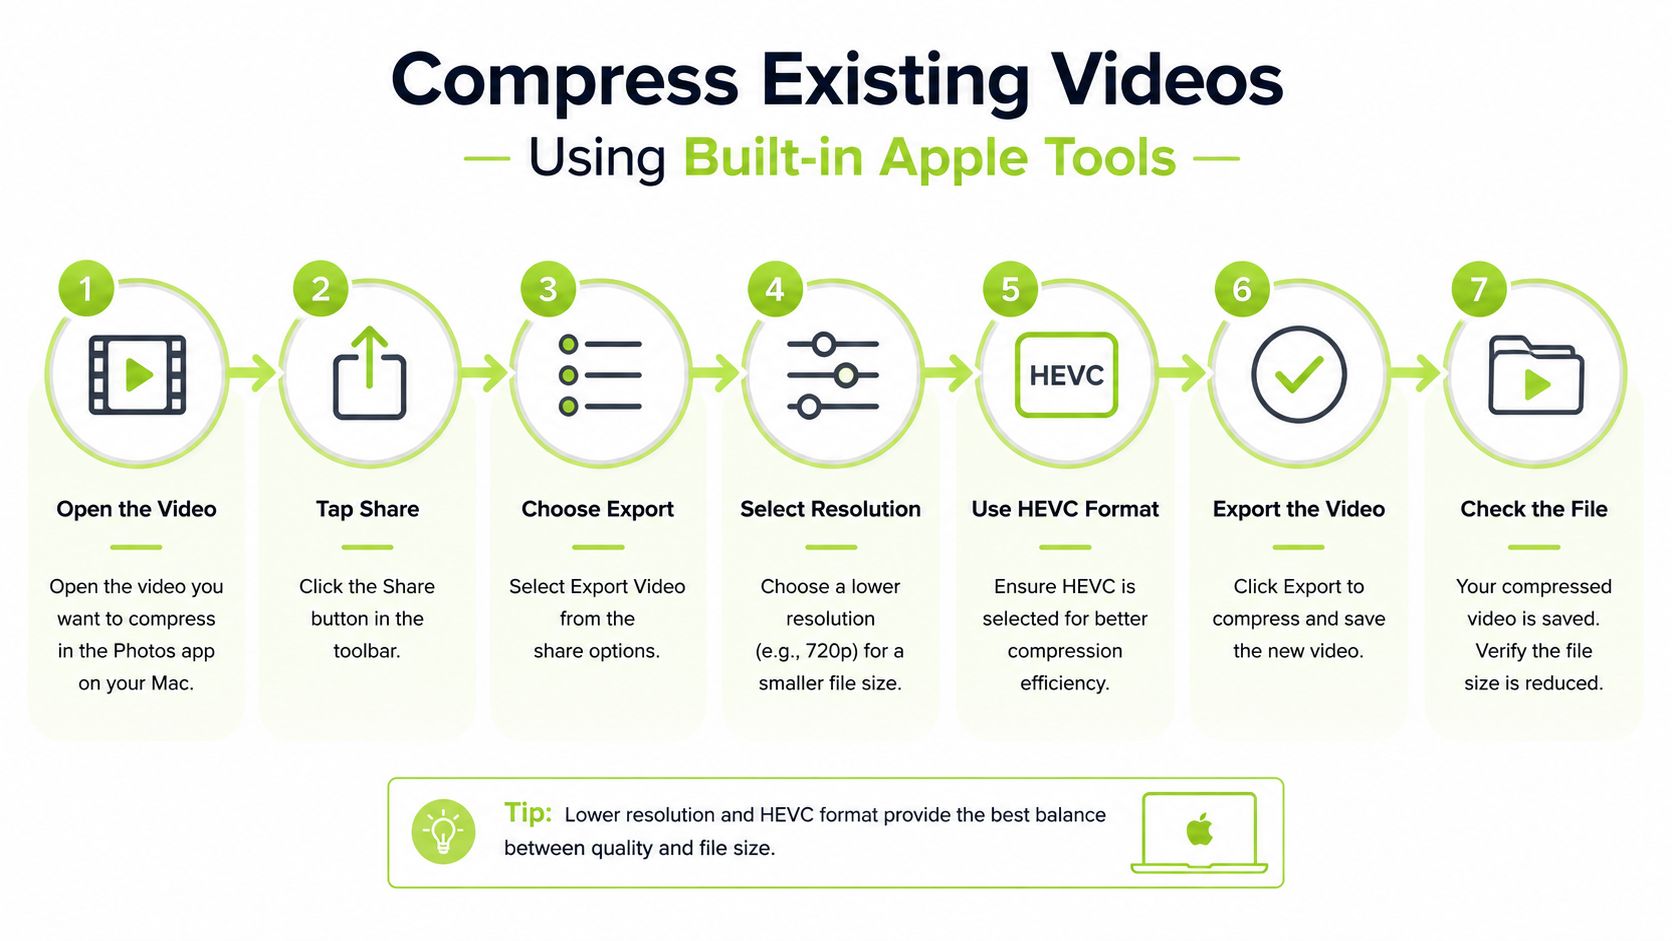
Photos can trim the beginning and end of a clip and save the edit as a new version. That removes unwanted content, but it does not provide the same export controls as iMovie.
Use Photos when the problem is excess footage. Use iMovie when the remaining video needs a smaller resolution or bitrate. Keeping those jobs separate prevents unnecessary quality loss.
Shrinking Videos with Third-Party Apps and LuminaClean
Native tools work well for one-off exports, but they get clumsy when the camera roll is full of videos that need review. Third-party compression apps make more sense when the job is less about editing a single clip and more about clearing a backlog. The important difference is privacy, because a video cleaner should not force personal media into a cloud workflow just to save space.
What to expect from privacy-first compression
Many video apps promise easy shrinking, but the trade-off is usually account creation, cloud processing, or a separate storage ecosystem. A better option is an app that keeps the whole process local on the phone, especially for family videos and personal clips. One example is LuminaClean, which scans on the iPhone for exact duplicates, visually similar photos, blurry photos, screenshots, and large videos, and offers free video compression without sending photos off-device.
Its privacy model is straightforward, 100% on-device, no account needed, and photos never leave the iPhone for processing. Nothing is deleted without a swipe or confirmation, and deleted items go to iOS Recently Deleted for 30 days. That matters when the goal is to clean aggressively without losing control.
The workflow matters more than the promise
The best cleanup tools don't just shrink videos. They help users find which clips are worth shrinking in the first place. That's where a scan-based app can beat a manual search through Photos, especially when storage is full of duplicates, near-duplicates, and old screen recordings.
A few useful differences stand out:
- Large-video discovery: Finds the files that are consuming space, instead of making the user guess.
- Swipe-based review: Keeps deletions deliberate, not automatic.
- Free starting access: Includes 65 free deletes to start, then 10 more every day, with an optional Premium subscription for a bigger backlog.
- Simple pricing structure: Only weekly and yearly plans, no monthly or lifetime option.
Apps that handle cleanup this way feel less like a compressor and more like a storage triage tool. The best ones reduce file size, but they also reduce the time spent hunting for the right clip to keep.
Automating Compression with iOS Shortcuts
iOS Shortcuts can turn video compression into a repeatable action instead of a manual chore. Community-built shortcuts often sit in the share sheet, so a video can be sent to a compression routine right after selection in Photos. That's useful for power users who process the same type of clip over and over.
The basic shortcut flow
A typical workflow starts in Photos, where the user shares a video into a Compress Video shortcut. The shortcut then handles the encoding steps and saves the smaller file back to the camera roll or another chosen destination. The attraction is speed, because the same sequence can be reused without opening a full editing app.
The logic is simple enough:
- Select the clip in Photos.
- Run the shortcut from the share sheet.
- Choose the target size or quality when the shortcut asks.
- Save the new file and keep the original if needed.
That setup works well for people who want a personalized compression tool without carrying another app around. The trade-off is that shortcuts can feel fiddly the first time, especially if the user wants to tune bitrate or resolution manually.
When shortcuts beat apps, and when they don't
Shortcuts are strongest when the goal is repeated, predictable compression. They're weaker when the library needs sorting first, because they don't help decide which videos are junk and which ones deserve to stay in full quality.
A compact rule helps here. Use Shortcuts for repeatable output, use an app for cleanup and triage, and use Apple's built-in export tools when only one clip needs to be resized quickly. That keeps the workflow from becoming more complicated than the storage problem itself.
Balancing Video Quality and Storage Space
Every iPhone video choice is a trade-off. A family archive clip deserves more care than a disposable message reply, and a travel highlight often deserves different settings than a casual lunch recording. The right answer is to match the recording and compression method to the purpose of the clip, not to compress everything by default.
Video Compression Decision Matrix
| Use Case | Recommended Method | Target Resolution |
|---|---|---|
| Family archive clip | Keep original, reduce only if needed later | 4K or original capture |
| Quick message share | iMovie export or shortcut compression | 720p |
| Casual everyday recording | Camera set to High Efficiency | 1080p or lower |
| Old clip already in Photos | Trim in Photos, then export from iMovie | 540p or 360p when size matters most |
A useful reference for people who care more about keeping visual quality than shrinking fast is this guide to lossless video download. That kind of workflow sits at the opposite end of the spectrum from aggressive compression, and it's worth understanding before deciding what to preserve.
A simple decision rule works better than guesswork
If the video is important and may be edited later, keep the better quality version. If it's being sent once and forgotten, compress hard enough to make it practical. If the phone keeps filling up, the problem usually isn't one giant file, it's a library full of clips that were never sorted.
A cleanup app can help separate those categories quickly, especially when the camera roll is loaded with similar shots and big files. For a broader explanation of the storage trade-offs behind compression, the overview in what video compression is on iPhone is a useful companion read.
The smartest iPhone storage habit is to combine all three layers, better capture settings, built-in export tools, and a privacy-first cleanup pass. That approach keeps the phone fast, the library manageable, and the important clips intact.
If the camera roll is already packed, start with the biggest files first, then change Camera settings so the next recordings don't create the same problem again. For a cleaner iPhone workflow that can find large videos, duplicates, and similar shots on-device, open LuminaClean on your iPhone and run a scan before the next storage warning shows up.
Clean up your camera roll in minutes.
LuminaClean scans on-device, groups duplicates, similar shots, screenshots and blurry photos, and deletes only what you confirm. Free to start, no account.