October 14, 2026
How to Find Duplicate Photos on iPhone
Your iPhone didn't get messy because of one bad day. It got messy because every decent moment produced five more photos than needed, then a screenshot got saved, then a burst stayed untouched, and suddenly the library feels impossible to sort. That's the core problem people run into when they try to find duplicate photos: the library is usually full of near-matches, not neat, obvious copies.
The fix is not “tap Merge and hope.” The fix is learning how to spot the copies, decide what's worth keeping, and use the right tool for the size of the mess. On iPhone, that means knowing when Apple's built-in Duplicates album is enough, when manual review still works, and when a grouped, on-device cleaner makes more sense.
Table of Contents
- Why Duplicate Photos Pile Up on Every iPhone
- Using Apple's Built-In Duplicates Album
- Manual Methods That Still Catch Real Cases
- The Duplicate Versus Judgment Problem
- When an On-Device Cleaner Is Worth It
- Running a Grouped Review Workflow Safely
- Keeping Your Camera Roll Clean From Here On
Why Duplicate Photos Pile Up on Every iPhone
A camera roll fills up because taking another shot is basically free. The old limits are gone, so people keep trying the same scene from a better angle, a sharper frame, or one more second later, then they forget which one was the keeper. That's why duplicate cleanup is really a behavior problem first, a file problem second.
A large 2019 analysis by Avast looked at nearly 3 billion photos from more than 6 million Android devices across 45 countries, and found that 16% of stored photos were duplicates or near-duplicates, with another 6% classified as poor-quality images, for a combined 22% that were unnecessary (ZDNET summary of the Avast analysis). That doesn't mean every phone has the same mix, but it does show the scale of the problem. Repeated shots are normal, not a sign that one person is unusually disorganized.
Why the pile grows so fast
Burst photography makes the problem worse because the phone captures several successive frames of the same moment. Screenshots and saved social posts add more clutter, and Photos makes it easy to keep everything without pausing to prune. Once the library gets large, people stop scrolling with confidence and start guessing.
Practical rule: if a photo has a twin, the real work is choosing the keeper, not just deleting the loser.
A 2023 Mixbook survey found that people had an average of 3,139 pictures and videos on their phones, and 80% said they had media they hadn't viewed since the day it was captured (Mixbook survey summary). That's why manual scrolling stops working. A library that size hides duplicates in plain sight.
By the end of this guide, the process should feel simple. Use Apple's built-in Duplicates album for exact matches, use manual review for the obvious near-matches, and use a grouped cleaner when the library is too large to trust memory alone.
Using Apple's Built-In Duplicates Album
Open Photos, go to Collections, swipe to Utilities, then tap Duplicates. Apple's duplicate tool only handles exact matches iOS has identified, so use it for clean copies first, not for every similar photo in your camera roll. Apple's support page shows the same path (Apple Photos Duplicates support).

If the album looks empty, don't assume your library is clean. Apple says duplicate analysis may need the iPhone to be locked and connected to power while Photos indexes the library, and that process can take time. If iCloud Photos is still syncing originals, the results can lag too.
What Merge actually keeps
Tap Merge, and iPhone keeps one version by combining the highest image quality with relevant data from the other copies. The rest goes to Recently Deleted, so you still have a recovery window if you picked the wrong keeper.
That behavior is correct for exact duplicates. If a photo has a twin, the main job is choosing the keeper, not just deleting the loser.
Apple's album does not catch near-identical shots, burst frames, screenshots, or Live Photos that look alike but are not true duplicates. It only works on files iOS recognizes as matching copies, which is why it should be your first pass, not your only pass.
If the Duplicates album still is not showing what you expect, use this guide on why the iPhone Duplicates album may not show results to check the usual indexing and sync issues.
For exact copies, Apple's tool is enough. For anything messier, you still need to judge each group yourself.
Manual Methods That Still Catch Real Cases
Manual cleanup still works if the library isn't huge. The trick is to stop scrolling randomly and start using repeatable patterns that expose near-duplicates faster.
The five moves that catch most obvious clutter
- Scroll in date bursts: Open Library and move through recent events one cluster at a time. A wedding album, for example, can hide thirty photos taken in a one-minute window, and only three of them deserve to stay.
- Use Favorites as anchors: Tap the heart on the keeper first, then compare the nearby shots against it. That makes the decision obvious because the best frame is already marked.
- Watch for file-size outliers: A re-export, crop, or compressed save often looks similar but weighs differently. Sorting by size won't solve everything, but it quickly surfaces suspicious versions.
- Search by likely filenames or subject terms: Saved screenshots and imports often follow patterns the user can spot. Search helps when the same image has been saved multiple times under slightly different names.
- Use Days view for side-by-side judgment: Looking at one event together is better than hunting through the whole timeline. Similar photos make more sense when they're adjacent.
That's also where burst cleanup matters. A burst sequence can leave several nearly identical frames, but only one has the open eyes, clean composition, or right expression. The quick win is to keep the sharpest shot and remove the rest.
A manual review is fine for a few hundred photos. Past that, it turns into a time tax.
The big weakness is scale. Once the library gets into the thousands, human review starts missing obvious repeats because attention runs out. That's the point where a grouped review workflow becomes the better tool.
The Duplicate Versus Judgment Problem
Finding duplicates is easy. Deciding what to keep is where the work slows down, because “duplicate” covers several different cases and they do not deserve the same answer.
Burst sequences are the classic trap. One frame has the best face, another has the best background, and a third is sharp but awkward. Live Photos complicate things further, because the still image and the motion both matter. Edited versions raise a different question, since the keeper might be the original capture, not the polished export.
Screenshots of documents or messages are another headache. Two images can look nearly identical while serving different purposes, so deleting the wrong one can erase useful context. Apple's duplicate workflow only handles recognized duplicates, while a real camera roll often contains what people mean when they say they probably do not need all of these (Apple on duplicates in Photos).
A clean review order keeps mistakes down. Check sharpness first, then composition, then whether motion or Live Photo value matters. After that, judge meaning. If one image is a document, receipt, or reminder, the keeper is usually the version with the clearest context.
If you are worried about removing the wrong version, see how to avoid deleting the wrong photos when cleaning duplicates (https://luminaclean.app/blog/photo-cleaner-deleted-wrong-photos.html).
Maximizing the number of files removed is the wrong goal. Preserving the best moment is the right one.
Cleanup tools miss that point because they treat every match as interchangeable, but users do not. Some photos are technically redundant and still emotionally different. That is why duplicate cleanup needs a judgment layer, not just a merge button.
When an On-Device Cleaner Is Worth It
The choice is simple, manual review or a grouped-review cleaner that runs locally on the phone. The best answer depends on library size, patience, and privacy expectations.
| Factor | Manual Review | On-Device Cleaner |
|---|---|---|
| Time spent | Spread out over many small sessions | Concentrated into one structured pass |
| What gets caught | Obvious near-matches the user notices | Exact duplicates plus visually similar photos, depending on the tool |
| What gets missed | Hidden bursts, screenshots, and re-exports | Still depends on the matching logic, so judgment is required |
| Privacy posture | Stays on the phone if done inside Photos | Best when analysis stays on-device |
| Cost | No app cost | Free tier or optional Premium if the backlog is large |
Manual review still makes sense for small libraries or for anyone who only wants to clean one event at a time. It also works well when sentimental decisions matter more than speed. But once the backlog gets messy, a grouped workflow saves attention.
That's where an app like LuminaClean fits. It scans on your iPhone, finds exact duplicates and visually similar photos, plus blurry photos, screenshots, and large videos, and keeps everything on-device with no account needed. Any tool that uploads the library to a remote server for analysis belongs in a different risk category entirely.
For a closer comparison of app options on iPhone, this overview is useful: best duplicate photo cleaner for iPhone.
If the goal is a quick touch-up, manual wins. If the goal is clearing a full backlog without giving the whole weekend away, a local grouped review is the better move.
Running a Grouped Review Workflow Safely
A good grouped workflow does three things well. It surfaces likely duplicates, makes the review easy, and never deletes anything without a final user action.
Open the app, scan on your iPhone, then sort by category, such as duplicates, similar shots, blurry photos, screenshots, and large videos. Open one group at a time and compare the images side by side. Then swipe to delete the loser, keep the keeper, confirm the choice, and clear Recently Deleted later if the goal is to free storage right away.
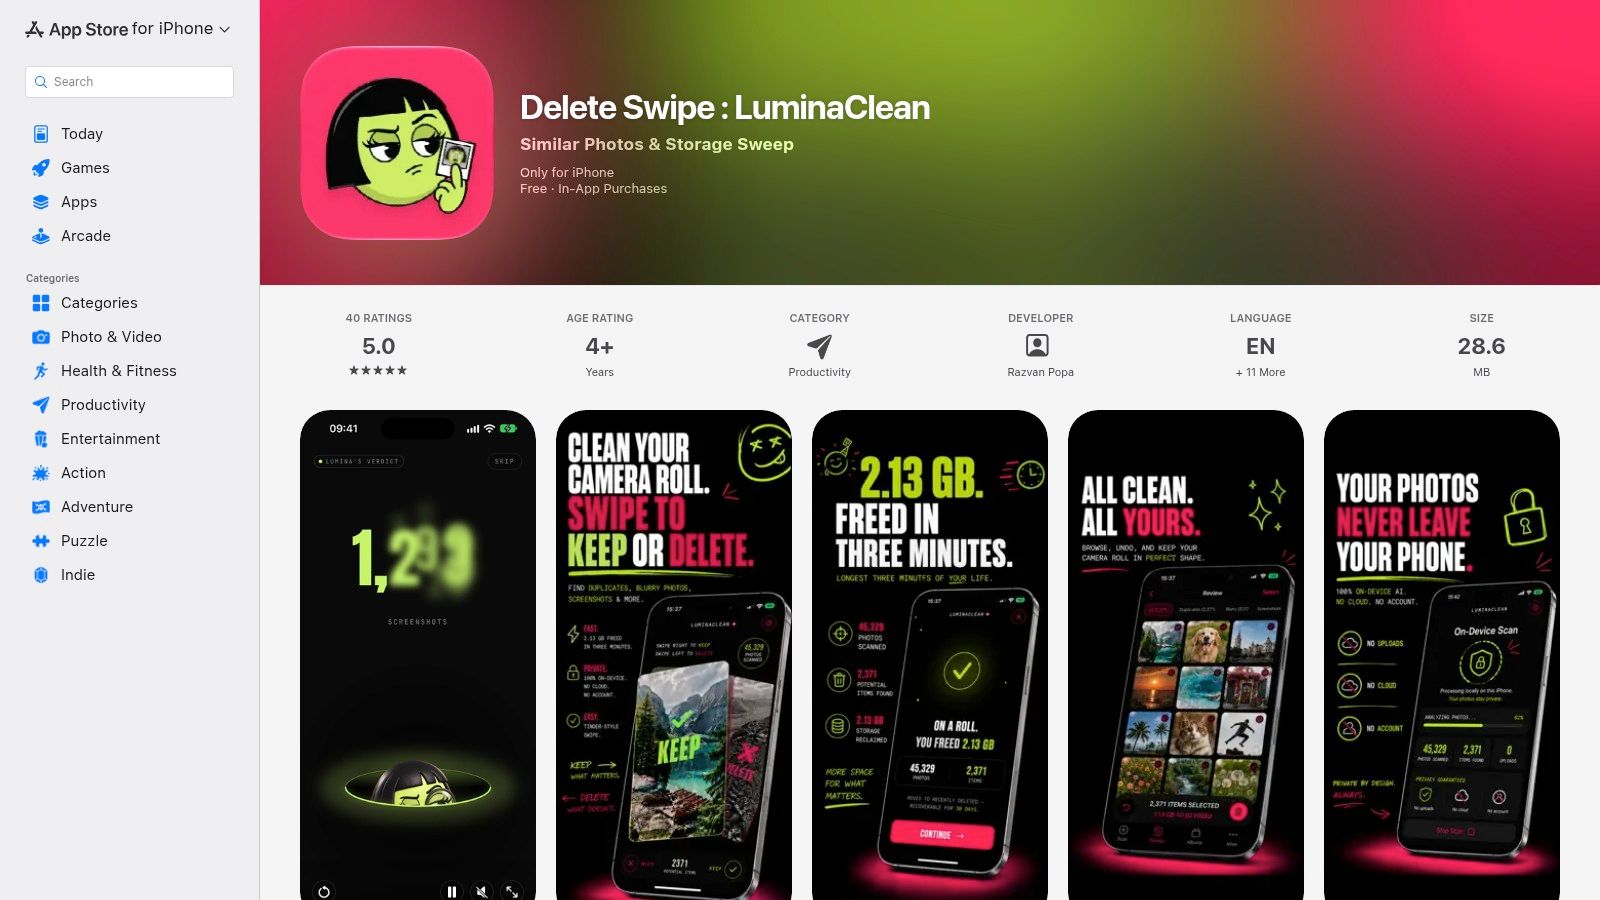
The safety rules matter more than the speed. Nothing should disappear unless the user swipes or confirms it, and deleted items should land in iOS Recently Deleted for the normal recovery window. That gives room for second thoughts without making the cleanup feel risky.
How the free access works
LuminaClean is free to start with 65 free deletes, then 10 more every day. If the camera roll has a big backlog, the optional Premium subscription is there for clearing it in one go. The available plans are weekly ($5.99) and yearly ($17.99).
Best practice: use the free allowance on your worst clusters first, not on easy exact matches that Apple can already handle.
The practical advantage of this kind of workflow is control. The app groups the clutter, but the user still decides what stays. That's the difference between cleanup and regret.
Keeping Your Camera Roll Clean From Here On
A cleaner library stays clean only if the habits change a little. Stop treating every burst like it deserves permanent storage, and review recent duplicates before they disappear into the timeline. On-device analysis keeps the whole process private because the photos stay on the iPhone instead of being uploaded for review.
Use three habits. Review burst shots the same week they were taken. Check the Duplicates album regularly. Run a quick on-device scan once a month so the mess never grows into a full-day project.
Tonight, open Photos, check the Duplicates album, and decide whether the rest of the library needs one deeper pass. If it does, pick the workflow that fits the size of the mess, then clear it while the good shots are still easy to recognize.
Clean up your camera roll in minutes.
LuminaClean scans on-device, groups duplicates, similar shots, screenshots and blurry photos, and deletes only what you confirm. Free to start, no account.